What is LiteRT?
Google recently rebranded TensorFlow Lite (TFLite) as LiteRT, expanding its vision for on-device AI across multiple frameworks. Originally released in 2017, TFLite has powered machine learning (ML) in over 100,000 apps and 2.7 billion devices worldwide. While it began as a runtime for TensorFlow models, Google has gradually expanded its offerings to encapsulate many of the other popular LiteRT now supports PyTorch, JAX, and Keras models, offering developers greater flexibility without sacrificing the high performance TFLite is known for.
%252520(1).webp)
As part of Google AI Edge, LiteRT provides robust tools for model conversion and optimization, allowing developers to seamlessly deploy both open-source and custom models on Android, iOS, and embedded devices. With LiteRT, Google aims to simplify on-device AI deployment, making it accessible and efficient across various platforms and frameworks.
Why Use LiteRT?
LiteRT is designed to make on-device AI accessible, efficient, and powerful, which is essential for developers building applications that need to process data locally on devices like smartphones, tablets, and embedded systems. Here’s why LiteRT is a go-to choice for on-device, real-time edge applications:
- Optimised for Real-Time Performance: LiteRT delivers fast, low-latency inference, crucial for real-time edge applications like augmented reality, driver assistance, and industrial IoT, where instant responses are essential. The low-latency performance of LiteRT ensures that applications remain responsive, which is particularly valuable for user-facing applications or time-sensitive tasks.
- Enhanced Privacy and Offline Functionality: By processing data directly on the device, LiteRT supports privacy-focused applications and enables offline functionality. Applications like medical scan diagnoses in remote villages can run without sending data to a central server, preserving user privacy and ensuring functionality even without an internet connection.
- Broad Device Compatibility: LiteRT supports deployment across Android, iOS, and embedded systems like microcontrollers, making it versatile for applications ranging from mobile health apps to industrial IoT. This extensive compatibility means developers can deploy their AI models across a wide array of devices, ensuring a seamless experience regardless of hardware limitations.
What’s New with LiteRT?
LiteRT boasts several improvements from the original TFLite, which can be broadly categorised into the following buckets:
- Simplified API: LiteRT, with its increased compatibility, now supports more universal functions for common model conversion and alteration tasks such as quantization and editing of model operations.
- Increased Compatibility: LiteRT has also improved its compatibility with more flexible setups. Major improvements include greater access across a variety of platforms from iOS devices to microcontrollers, but also smaller details, such as more flexible model loader classes that allow for custom models to fit into standard model loading workflows.
- Increased Framework Specific Customizability: Previous iterations of TensorFlow and TFLite provided some alignment with PyTorch but were mired with compatibility issues from operation types to the general loading architecture as a whole. LiteRT has demonstrated a more collaborative outlook with its support for PyTorch specific optimizations through a separate repository, AI Edge Torch. This enables users to get the best of both worlds, by using PyTorch models when needed for training your preferred models out of the box, while still being able to leverage LiteRT’s better and more native support for Android and microcontrollers.
Using LiteRT with Datature’s Models
Using LiteRT to deploy Datature’s models is a simple process. LiteRT continues to natively support the same TFLite FlatBuffer file type. With Datature’s model export tools, users can simply export their preferred model to the TFLite format. Then, depending on their preferred environment, they can use the LiteRT SDK that is requisite and load the model from there.
.webp)
There are a few different ways to further optimise the procedure. We can also leverage Datature’s Advanced Export to quantize and prune the model to decrease the model size as well as improve model performance depending on the deployment device. For instance, quantizing to Float16 and INT8 show considerable benefits on mobile devices, but for microcontrollers and smaller CPUs, INT8 is often necessary to see full benefits and Float16 may not show any benefits at all.
Additionally, depending on the framework of deployment, there are optimizations unique to each framework, such as the ability to set certain operations to specific compute in order to reduce load or improve performance. For instance, iOS devices need to leverage not just the GPU on the device but more specifically Apple’s Neural Engine in order to achieve the greatest overall performance improvement.
To demonstrate, we show an example below of how to load the model onto an Android device as well as ensure that it runs in a performant fashion using LiteRT’s latest build.
Deploying on Android
Prerequisites
Ensure that you have done the following before you follow this tutorial:
- Train a model on Datature Nexus
- Install Android Studio
- Prepare an Android device such that it has developer debugging enabled
Export the Model as TFLite on Datature Nexus
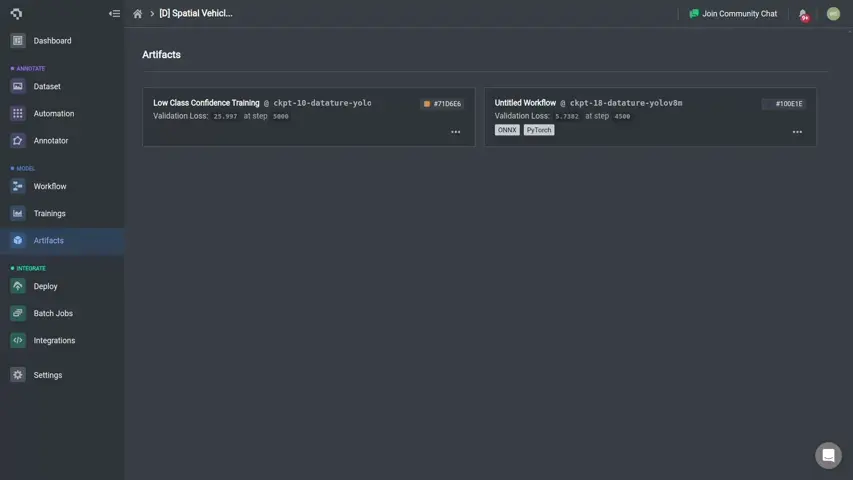
To export your trained model on Nexus as a TFLite model, you can navigate to the Artifacts page and select more options, and select to generate a TFLite Model. Optionally, you can also choose to prune and/or quantize your models to improve latency on mobile devices. After a few minutes, the generated artifact will be downloadable as a .zip file.

(Optional) Alter Specific Operations with LiteRT
For more detailed granularity regarding what operations should be optimized, LiteRT provides their own API for making these specifications. For instance, if one wanted to export a PyTorch model and convert their own model with PyTorch quantization specifications, they could use the following API calls.
In the code example below, we create our own QuantizationConfig class, in which we use a MinMaxObserver to perform the quantization only for the weights. This quantizes the main bulk of the model but not overly-quantizes such that the biases are affected as well. This QuantizationConfig class can be customized in a variety of ways to target specific operations or quantize in specific ways depending on the use case.
For Datature models, we rarely see such a requirement that performance is heavily predicated on specific operations, so global quantization as per what is done through our artifact export is sufficient.
Import LiteRT into Build
It’s fairly simple to include LiteRT as a library for the app build. The build.gradle file should have the following inclusions to make it possible. To do so, one can open their Android project on Android Studio and ensure changes below are made.
If you would like to just use a default project for ease of integration, you can use these projects for image classification, object detection, or image segmentation.
Integrate Model into Android Studio Project
Integrating the model is quite simple using LiteRT’s new model loading API. Model loading logic is the same, so for instance, in the object detection app, under the file object_detection/objectdetector/ObjectDetectorHelper.kt, the following lines should be modified to match your filename.
Additionally, due to the enhanced flexibility of processing model outputs, the only final step is to ensure that the model output shapes and processing align. Notably, Datature’s output shape for image segmentation is BxCxHxW and not BxHxWxC. As such, image function processing should be modified to respect this new shape, such as the following functions equivalently named in ImageSegmentationHelper.kt should be modified.
Above, I make modifications to ensure that the masks are being iterated through correctly, as well as ensure that the output shape is correct.
Connect and Install onto Device
Once the above code modifications have been completed, we can proceed with running the build. You should select your connected device either through USB or wireless, and select the green run button. After a few seconds, the app will build on your device and you should see a UI that looks like something below. You can point your device at objects of interest to visualize the predictions.

Congratulations, you are now running a model on your Android device using Google’s latest LiteRT library and are safe for more library improvements with minimal friction in the future.
What’s Next?
Now, you can go ahead and train your own custom computer vision model and deploy that onto any Android device or others. LiteRT supports deployments on a wide variety of devices, but it remains true that performance improvements are still best on Android devices. Also, we will be sure to keep LiteRT internal improvements in mind for further alignment.
Developer’s Roadmap
Datature understands that deployment can be one of the major hurdles and certain one of the most frustrating obstacles in terms of putting your computer vision model in production. With this in mind, Datature endeavours to provide consistently modern support such that computer vision models can be easily deployed on a device of your choosing. If you have a device that you would like to deploy your models on that you do not see an obvious path for deployment, please contact us and we will determine ways to better improve that deployment experience. We will also continue to monitor LiteRT changes in order to ensure that Datature models can leverage all the latest improvements and optimizations.
Want to Get Started?
If you have questions, feel free to join our Community Slack to post your questions or contact us if you wish to learn more about how LiteRT can be integrated into your use case.
For more detailed information about LiteRT capabilities, customization options, or answers to any common questions you might have, read more on our Developer Portal.
.png)


