.jpeg)

What is Annotation Automation?
Annotation Automation is a tool on Datature’s Nexus that helps teams to streamline their annotation workflow by automating the labelling process. It provides a platform for teams to manage annotation projects, assign tasks to annotators, track progress, and ensure annotation quality control.
Why is Annotation Automation Important?
Labelling large datasets is tedious and time consuming. One method to reduce the time and effort required for annotations is to increase the number of annotators. However, task delegation of the specific assets to annotate for each annotator tends to be verbal, which can result in annotators accidentally annotating the same group of assets. Annotation Automation minimises any wasted annotation time by allowing project owners to assign specific asset groups to each annotator. Every annotator will only see the assets that they have been assigned to annotate. This reduces clutter for large datasets on Nexus and provides better task clarity.
Working with a team on data annotation also raises a critical issue on consistency. Different annotators have different levels of experience and varying judgement, which can result in inconsistent labels. Annotation Automation improves annotation accuracy and consistency by allowing project owners to rope in reviewers to assess both the annotation progress and the quality of the annotations. This gives rise to a feedback loop where reviewers and annotators work together to ensure that the dataset is labelled both efficiently and accurately.
By streamlining the entire annotation workflow, teams can focus on more complex tasks in the MLOps pipeline, such as model training and deployment.
How Can You Build an Automation Workflow on Nexus?
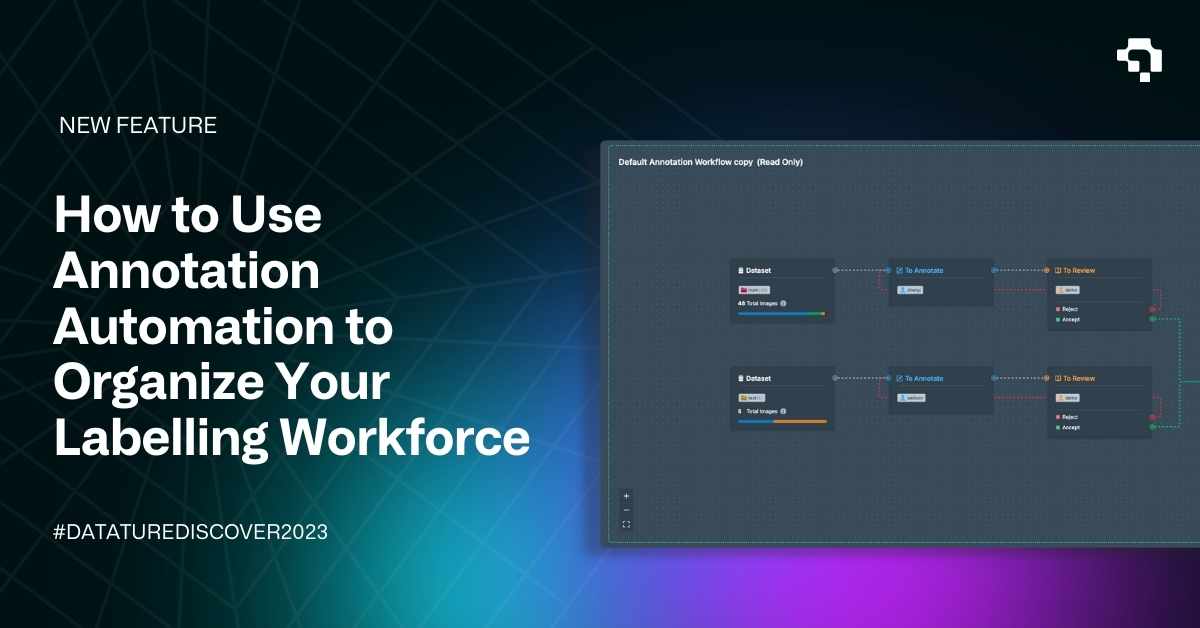
In the Automation tab, you will see a default annotation workflow. This provides a simple, read-only template to guide new users. It consists of three simple automation blocks:
- Dataset: Selects the entire project dataset by default,
- To Annotate: All collaborators are selected to annotate the dataset by default,
- Completed: Provides confirmation that all assets have been acceptably annotated and is ready to be fed into a model for training.

The linearity of the default workflow works if you have a small dataset that requires only one person to annotate. However, if your project contains a huge number of assets, or if there are multiple complex-shaped objects for each asset, you may want to invite multiple collaborators into the project to divide the annotation workload. Hence, we can customise the automation workflow to cater to this need.
To start, select Actions at the upper left corner and select Duplicate Workflow. This will duplicate the default workflow and create an editable copy. You can assign which asset groups should be annotated, and who the responsible annotator will be.

If you wish to include reviewers to ensure annotation quality, you can insert a To Review block after the To Annotate block and assign certain users to take on a reviewer role. You can also decide how to handle cases regarding the approval or rejection of annotations. In this example, there is only one review stage, where the rejected annotations are sent back for re-annotation, while the approved annotations are marked as completed. Of course, you can include multiple stages of reviews or have separate annotator groups for re-annotation depending on your needs and the size of your team.

If you have divided your dataset into asset groups based on a certain criteria, you can divide the annotation workload by creating parallel workflows, each with their own annotators and reviewers who work independently on a subset of the dataset. Ultimately, the workflows should all connect to a single Completed block at the end.

How Will This Look on the Annotator?
For annotators with a set workflow, they will see something like the screenshot below, in which they can make annotations, and then confirm their annotations for submission to the next step. In the Annotator page, annotators will only see the assets that they have been assigned to annotate, as the asset bar below is automatically filtered for assets assigned to the user. This can be helpful if your dataset is large, so annotators do not have to scroll through irrelevant assets. If needed, annotators can further use the Filter button to select specific asset groups to manually filter the annotations.
Annotators can make as many annotations as they feel are necessary. As long as an asset contains at least one annotation, it will be automatically marked with an Annotated status, but the status can also be manually changed. If the annotator has finished annotating the asset, they can submit the asset for review either by selecting the Submit button or pressing K. This marks the asset with a Review status.

Once an asset has been marked for review, reviewers will be able to see it by enabling Review Mode. They can then approve or reject the asset, which will change the asset status based on what is defined in the Annotation Automation workflow.

Additionally, the Annotator also displays helpful cues to show what stage is next for the asset in the annotation process. The top right corner displays dashed line segments that show the next blocks by their icons in the small circles. For example, in the sample view for the annotator, the top right line segment shows that a review block is next before it can be completed.
Once all assets have been given a Completed status, you are now ready to train a model with these completed images! Check out this article if you wish to train a YOLOX object detection model on your own custom dataset, or if you want to learn more about building model workflows and run trainings.
Our Developer’s Roadmap
Annotation Automation is the first step to allow users to easily manage cross-collaboration annotation efforts. We are constantly looking for ways to expand the suite of tools that grant users more fine-grained control over this annotation process. For example, we are working towards introducing a consensus scoring system and other annotation performance metrics to help track labelling efficiency, and also ensure that the quality of annotations are up to standard.
Want to Get Started?
If you have questions, feel free to join our Community Slack to post your questions or contact us about how Annotation Automation fits in with your usage.
For more detailed information about the Annotation Automation functionality, customization options, or answers to any common questions you might have, read more about the process on our Developer Portal.
.png)
.png)