


Prelude
Typical tasks within this category are object detection and instance segmentation. Object detection requires computer vision models to output bounding boxes that surround the desired objects. Instance segmentation is a more complex task that requires models to output binary masks that represent which pixels in the image can be assigned to the desired objects. These tasks still cover a wide range of applications and researchers remain heavily invested in improvements.
How Did the YOLO Model Series Start?

YOLO first arrived in the inaugural 2015 paper by Joseph Redmon et al., “You Only Look Once: Unified, Real-Time Object Detection”. The model architecture was significant because it was designed to only look at the image once, thus making a traditionally two-stage process of predicting location and then making a classification into a single stage process, in which classified objects are also mapped together with bounding boxes.
The YOLO model series is renowned in the computer vision scene due to its task flexibility and model compactness, while still maintaining state-of-the-art performance. This has allowed YOLO models to be integrated into many industry verticals and accessible to a broad range of machine learning practitioners.
A secondary reason for its continued success has been its transition from its initial implementations from versions 1-4 in Darknet, to the more commonly used PyTorch framework with YOLOv5 through the work of Ultralytics. Given the stronger research community in PyTorch, the YOLO model series received significant development attention and rapid improvements.
YOLOv8 is the result of many developmental iterations since its inception that continues to challenge state-of-the-art model architectures in the object detection space.
What’s New in YOLOv8?
YOLOv8 was recently released by Ultralytics as the latest and greatest version in the YOLO model series. Though a reviewed paper has not yet been released, our observations on the repository show several significant features that may help to differentiate it from other object detection models.
Architecturally, there have been a few major changes, starting with thematic changes in the way that the model receives and analyzes the visual data. Compared to previous YOLO models such as YOLOv4, YOLOv8 is anchor-free. This is similar to other offshoots of the YOLO model series, such as YOLOX, which is a popular alternative in the YOLO model series that was designed to simplify and accelerate performance while maintaining high accuracy. Empirically, the best anchor-free approaches have demonstrated comparable performance as well as improved performance. However, from a theoretical perspective, there are more trade-offs. Anchor-free approaches are more flexible in terms of detection because they directly detect objects without preset anchors which anchor-based approaches require. These can be biased based on previous training, and thus do not generalize well to new data. However, because of the flexibility, it is possible that this can lead to maligned and misleading predictions that are not as logically grounded in the more traditional, human flow of detecting and observing objects.
Additionally, YOLOv8 has architectural changes at the more technically specific level. The main convolutional block in the YOLO architecture has been updated to include more detail for features at varying levels. The new building block, `C2f`, concatenates all outputs from the `Bottleneck`, where `C3` only takes the final `Bottleneck` output. This alters the modality of the convolution blocks to make use of the multiple intermediate convolution outputs, which increases the model’s sensitivity to more details in features extracted from the visual imagery.
Finally, YOLOv8 has utilized the strong community support that has led to its popularity and ubiquity to empirically determine more effective training schedules and methods. For example, it does not maintain the same training strategy throughout the whole training process. In one case, the augmentation called mosaic augmentation which stitches images together to force the model to learn how to perform detections with different combinations and locations of objects has been shown to degrade performance if it is still used towards the end of the training process. Thus, YOLOv8, through empirical experimentation, has manually selected the most efficacious training setup.
How to Get Started with YOLOv8?
Install Package Dependencies
YOLOv8 can be installed by cloning source repository at https://github.com/ultralytics/ultralytics or install the ultralytics pip package.
Method 1: Install from pip
Method 2: Clone from source repository
Prepare Annotations for Custom Dataset
To train a YOLO model, we need to prepare training images and the appropriate annotations. For a YOLO Object Detection model, each .png/.jpg image requires a .txt annotation file with the same filename in the same directory. Each annotation file has one or several lines, each contains a bounding box annotation with the format <class> <x> <y> <w> <h>.
- <x> <y> <w> <h>: Bounding box size and location with x and y being center coordinates while w and h are the width and height of the bounding box
- <class>: The class index to be assigned to each bounding box ranging from 0 to num_classes - 1. For our custom dataset, we are detecting a single class boat , hence we only have one class index 0.
We use Datature Nexus to perform bounding box annotations. First let’s create a new project by clicking on the “Create New Project” card and selecting “Object Detection”for Type and “Image”for Content. We will name the project Ship YOLO.

Next, we will upload the custom image dataset onto the Nexus platform by clicking on “Assets” under Project Overview on the project home page.
.gif)
Nexus supports both annotation upload and manual labeling. Our custom dataset has been partially annotated in .CSV Four Corner Detection format. We will upload the available annotations so that we do not need to label all the images.
.gif)
Next we label the remaining unannotated image with Nexus Annotator labeling tool. For Object Detection, we use rectangle bounding boxes to annotate the objects.
.gif)
After all 500 images have been annotated, we can download the annotations in the format suitable for training YOLO models. Select YOLO Darknet under Export Format. For Train-Test-Split, we will use 70% of the images for training and 30% of the images for performance validation. Remember to normalize the coordinates of the annotations.
.gif)
Now we have the annotation files with the correct format for training YOLO Object Detection models, we will arrange the file directory and prepare the dataset .yaml file for training and validation.

Train Models
After preparing the training data and annotations, we can start training the YOLOv8 Object Detection model. There are two ways to train the models, using CLI or Python SDK.
We can start training in CLI.
Here we can simply need to call a single CLI command line:
Alternatively, run training using Python SDK:
By default, the model training will call arguments from the default config file at ultralytics/yolo/cfg/default.yaml. To modify the training settings, add the custom arguments to override default training settings. Here we set epochs = 8, batch = 8, image_size = 800 and plots = True. For the list of all customizable configurations, refer to https://docs.ultralytics.com/cfg
Evaluate Training Performance
If we use plots=True training settings, several useful graphs will be generated to evaluate the training performance. We can monitor several metrics such as mAP, regression loss, classification loss, precision, recall, etc. For example, from the below training run, we can see that model performance stops improving at training epoch 40.

Validate Model Performance
Similar to Training, we can validate model performance on a validation dataset using CLI command or Python SDK.
To validate the model in CLI, we can use the standard CLI command by setting mode=val and model={checkpoint_path}. Here we only use prediction boxes with minimum class probability of 0.5 by setting conf=0.5. For a list of arguments for model validation, refer to https://docs.ultralytics.com/cfg/
Alternatively, we can use Python SDK to validate the model performance.
The outputs will be validation scores (mAP, R) on the validation dataset.

Model Inference
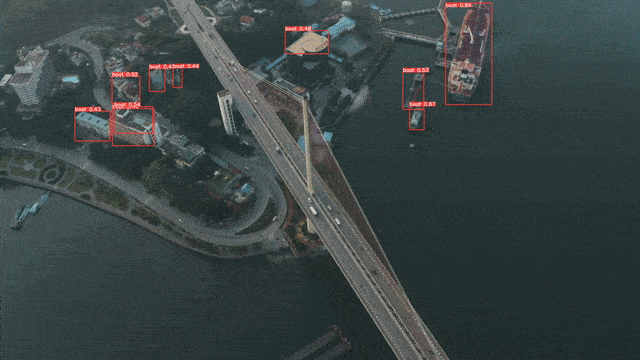
Once we are satisfied with the performance of our model, we can perform inference on a single image or multiple images. We can do this by either setting mode=predict when using CLI command or call model.predict when using Python SDK. Set save=True to generate plotted images with prediction bounding boxes.
Using CLI Command:
Using Python SDK:

We can also use model inference on videos by simply configuring source={video_path}.
The saved output is a video with annotations:
Object detection as a computer vision task has powerful applications beyond its original scope. As object detection models like YOLOv8 continue to become increasingly accurate with lower latency, these models can be translated to address more difficult tasks. One such task is object tracking, in which instances are automatically identified and tracked throughout the video frame.
To see how powerful, yet compact models like YOLOv8 can be integrated into such a pipeline, please head over to our Multiple Object Tracking article to see how you can utilize your model to tackle the complex task of object tracking.
Want to Get Started?
Here is the YOLOv8 Notebook used to train and perform inference on the Custom dataset.
If you have questions, feel free to join our Community Slack to post your questions or contact us to train your own YOLOv8 Object Detection Model.
For more detailed information about the model functionality, customization options, or answers to any common questions you might have, read more on our Developer Portal.
Credits:
.png)
.png)